[ROS1] ROS1 노드 통신 (1대1 ~ N대N)
ROS 1:1 통신
노드 통신을 위한 패키지 만들기
전체 구성
teacher 노드(publisher)에서 student 노드(subscriber)로 my_topic 토픽을 전송하는 구조

노드를 통한 전송을 하기 위한 package 구조는 아래와 같다

package 생성
msg_send 라는 새로운 package를 만든 후
package 파일 내에 launch 폴더를 만들고
새롭게 생성된 package를 빌드한다
catkin_create_pkg msg_send std_msgs rospy
cd msg_send
mkdir launch
cm # catkin_make
node와 topic을 생성하는 코드
topic을 발행하는 파이썬 코드를 작성한다
teacher.py
#!/usr/bin/env python3

import rospy
from std_msgs.msg import string

# 노드의 이름은 teacher
rospy.init_node('teacher')

# topic의 이름은 my_topic, 타입은 string
pub = rospy.Publisher ('my_topic', String)

rate = rospy.Rate (2)

while not rospy.is_shutdown():
    pub.publish('call me please')
    rate.sleep()
topic을 받아서 메시지를 화면에 출력하는 파이썬 코드를 작성한다
student.py
#!/usr/bin/env python3

import rospy
from std_msgs.msg import String

def callback(msg):
    print(msg.data) # 입력 받은 메시지를 출력한다

# 노드의 이름은 student
rospy.init_node('student')

# string 타입의 my_topic 토픽을 받으면 callback 함수를 호출하는 subscriber
sub = rospy.Subscriber('my_topic',String, callback)

rospy.spin()
launch 파일 생성
publisher와 subscriber 노드를 실행하는 launch 파일 생성
m_send.launch
<launch>
    <node pkg="msg_send" type="teacher.py" name="teacher"/ >
    <node pkg="msg_send" type="student.py" name="student" output="screen" />
</launch>
launch 파일을 생성한 후 빌드한다
추가한 파일은 실행 권한을 부여한다
이후 launch 파일을 실행한다
cm # 빌드
chmod +x teacher.py student.py # 권한 부여
roslaunch msg_send m_send.launch # package의 launch 파일 실행
아래와 같은 결과가 나타난다


ROS N:N 통신
Int32 타입의 메시지를 주고 받는 노드
기존에 string을 메시지로 보낸 코드에서
int32 타입을 보내는 코드로 수정한다
노드와 topic을 생성하는 코드
teacher_int.py
#!/usr/bin/env python3

import rospy
from std_msgs.msg import Int32 # int32 호출

rospy.init_node('teacher')

pub = rospy.Publisher ('my_topic', Int32) # int32로 초기화

rate = rospy.Rate (2)
count = 1

while not rospy.is_shutdown():
    pub. publish (count)
    count = count+1 # 갈수록 기다리는 시간이 증가
    rate.sleep()
student_int.py
#!/usr/bin/env python3

import rospy
from std_msgs.msg import Int32

def callback (msg) :
	print msg.data

rospy.init_node('student')

sub = rospy.Subscriber ('my_topic',Int32, callback)

rospy.spin()
노드를 여러 개 띄울 때
하나의 코드로 여러 개의 노드를 연결하려면
각 노드의 이름을 다르게 해야한다
노드를 생성하는 코드 내에서
anonymous = True
를 통해 노드 이름을 자동으로 설정한다
같은 이름의 노드가 실행되는 경우
이후에 실행되는 노드는 노드 이름 뒤에 숫자가 추가된다
launch 파일을 이용해서 roslaunch 명령으로 여러 노드를 띄울 수 있다
publisher(teacher)와 subscriber(student)의 이름을 개별적으로 설정할 수 있다
아래는 2:2 통신 환경이다
<launch>
    <node pkg="msg_send" type="teacher_int.py" name="teacher1"/>
    <node pkg="msg_send" type="teacher_int.py" name="teacher2"/>
    <node pkg="msg_send" type="student_int.py" name="student1" output="screen"/>
    <node pkg="msg_send" type="student_int.py" name="student2" output="screen"/>
</launch>
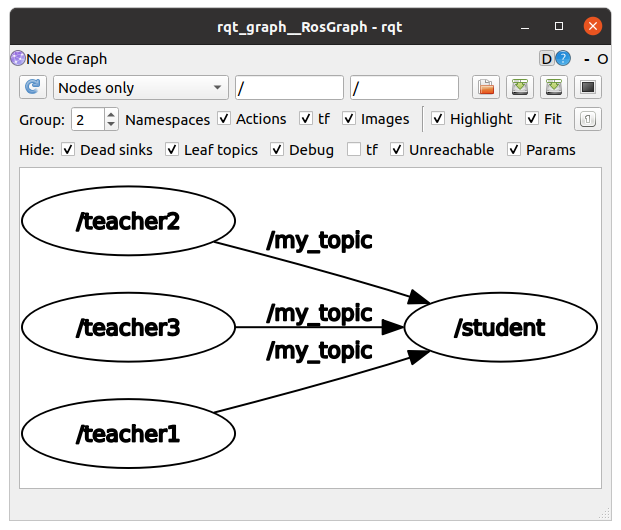
1:N 통신
publisher 노드 1개와 subscriber 노드 3개를 구성하는 launch 파일을 아래와 같다
m_send_1n.launch
<launch>
    <node pkg="msg_send" type="teacher_int.py" name="teacher"/>
    <node pkg="msg_send" type="student_int.py" name="student1" output="screen"/>
    <node pkg="msg_send" type="student_int.py" name="student2" output="screen"/>
    <node pkg="msg_send" type="student_int.py" name="student3" output="screen"/>
</launch>
rqt graph 는 아래와 같다

N:1 통신
publisher 노드 3개와 subscriber 노드 1개를 구성하는 launch 파일을 아래와 같다
m_send_n1.launch
<launch>
    <node pkg="msg_send" type="teacher_int.py" name="teacher1"/>
    <node pkg="msg_send" type="teacher_int.py" name="teacher2" />
    <node pkg="msg_send" type="teacher_int.py" name="teacher3"/>
    <node pkg="msg_send" type="student_int.py" name="student" output="screen"/>
</launch>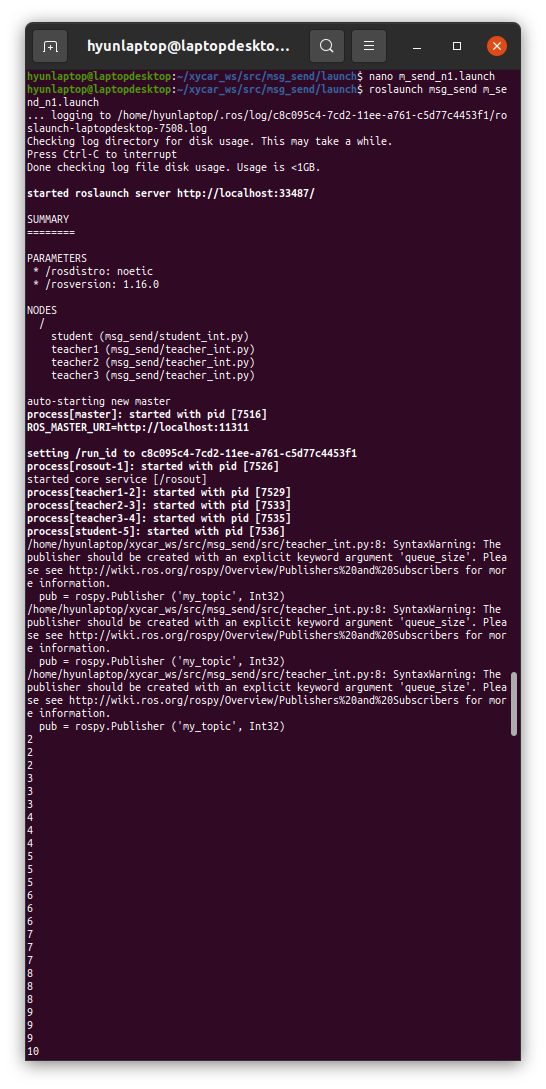
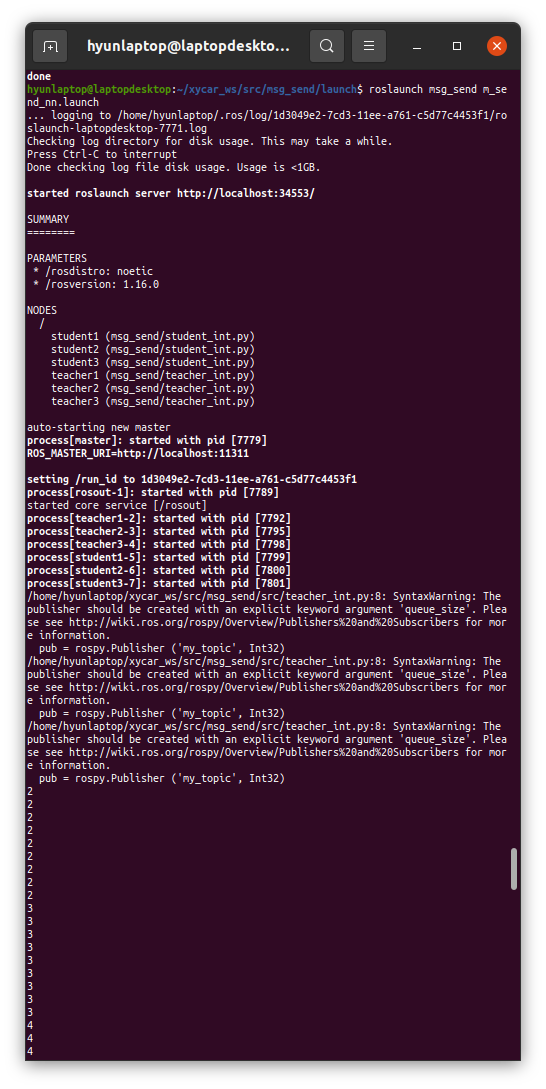
N:N 통신
원하는 만큼 publisher 노드와 subscriber 노드를 생성한다
m_send_nn.launch
<launch>
    <node pkg="msg_send" type="teacher_int.py" name="teacher1"/>
    <node pkg="msg_send" type="teacher_int.py" name="teacher2" />
    <node pkg="msg_send" type="teacher_int.py" name="teacher3"/>
    <node pkg="msg_send" type="student_int.py" name="student1" output="screen"/>
    <node pkg="msg_send" type="student_int.py" name="student2" output="screen"/>
    <node pkg="msg_send" type="student_int.py" name="student3" output="screen"/>
</launch>